

打工人的痛点:邮箱太多,看不过来!
作为一个现代打工人/斜杠青年,谁手里没个三四个邮箱?
公司的阿里云/腾讯云企业邮箱、自己接活用的网易邮箱、国外的 Gmail……
为了不错过重要邮件,我们通常的完美解决方案是:把所有次要/工作邮箱的邮件,全部「自动转发」到自己的主用邮箱(比如 QQ 邮箱)。
为什么大家都爱转到 QQ 邮箱?
- 推送极其及时: 依托微信/QQ的常驻后台,新邮件秒级提醒,绝不漏掉老板的夺命连环 Call。
- 容量大且无限扩容: 免费送超大网盘,当作所有邮件的“终极备份库”再合适不过。
- 统一管理: 每天只查一个邮箱,告别各个App来回切的烦恼。
遇到拦路虎:管理员禁用了自动转发!
理想很丰满,现实很骨感。当你兴冲冲地跑到公司邮箱后台准备设置时,却经常会看到这样一行冷冰冰的提示:
❌ “抱歉,出于安全考虑,企业管理员已禁用邮件自动转发功能。”

很多公司为了防止员工将内部资料泄露到外部个人邮箱,直接在系统层面切断了自动转发的入口。
难道我们只能乖乖安装那个臃肿的企业邮箱客户端,每天忍受它时不时的掉线和延迟吗?
当然不是!如果前端路不通,我们就用代码走后门! 👨💻
破局神器:用 Python 打造私人邮件转发机器人
既然系统不让我们用“自动转发”规则,那我们就模拟人工操作:
“找个机器人,每隔几秒钟看一眼收件箱,发现新邮件,就原封不动地手动发送到我的 QQ 邮箱。”
今天,我们就以限制最严的阿里云企业邮箱为例,分享一段轻量级的 Python 脚本。它不仅能绕过管理员的限制,还能实现**“无损转发”**!
直接上硬核干货代码: (建议在电脑端复制或转发到微信文件助手)
import imaplib
import smtplib
import ssl
import time
import json
import logging
import email
from email.utils import formatdate, parseaddr
from email.header import decode_header
# ==========================
# 第一步:配置你的专属参数
# ==========================
IMAP_HOST = "imap.mxhichina.com" # 阿里云IMAP服务器(其他邮箱请自行更改)
SMTP_HOST = "smtp.mxhichina.com" # 阿里云SMTP服务器
EMAIL_ACCOUNT = "your-enterprise@yourdomain.com" # 你的企业邮箱账号
EMAIL_PASSWORD = "your-app-password" # 邮箱密码 或 应用专用密码(强烈建议使用应用密码)
TARGET_EMAIL = "your-personal-email@qq.com" # 接收转发的个人主邮箱(如QQ邮箱)
CHECK_INTERVAL = 5 # 轮询间隔(秒),即每5秒检查一次新邮件
UID_STORE_FILE = "forwarded_uids.json" # 本地记录已转发邮件的记忆文件
# ==========================
# 日志配置(让你清楚看到代码在干嘛)
# ==========================
logging.basicConfig(
level=logging.INFO,
format="%(asctime)s - %(levelname)s - %(message)s"
)
# --- 以下为核心处理逻辑,新手无需修改,直接运行即可 ---
# ==========================
# UID 持久化
# ==========================
def load_forwarded_uids():
try:
with open(UID_STORE_FILE, "r") as f:
return set(json.load(f))
except:
return set()
def save_forwarded_uids(uids):
with open(UID_STORE_FILE, "w") as f:
json.dump(list(uids), f)
# ==========================
# IMAP 操作
# ==========================
def connect_imap(first_connect=False):
mail = imaplib.IMAP4_SSL(IMAP_HOST, 993)
if first_connect:
logging.info(f"✅ 成功连接到 IMAP 服务器: {IMAP_HOST}:993")
mail.login(EMAIL_ACCOUNT, EMAIL_PASSWORD)
if first_connect:
logging.info("✅ IMAP 登录成功")
mail.select("INBOX", readonly=True)
return mail
def fetch_unseen_uids(mail):
status, response = mail.uid("search", None, "UNSEEN")
if status != "OK":
return []
return response[0].split()
def fetch_raw_email(mail, uid):
status, data = mail.uid("fetch", uid, "(BODY.PEEK[])")
if status != "OK":
return None
return data[0][1]
# ==========================
# 邮件解析
# ==========================
def decode_mime_words(text):
decoded = ""
for part, encoding in decode_header(text):
if isinstance(part, bytes):
decoded += part.decode(encoding or "utf-8", errors="ignore")
else:
decoded += part
return decoded
def parse_email_info(raw_email_bytes):
msg = email.message_from_bytes(raw_email_bytes)
subject = decode_mime_words(msg.get("Subject", ""))
name, addr = parseaddr(msg.get("From", ""))
if name:
name = decode_mime_words(name)
from_display = f"{name} <{addr}>"
else:
from_display = addr
return subject, from_display
def count_attachments(raw_email_bytes):
msg = email.message_from_bytes(raw_email_bytes)
count = 0
for part in msg.walk():
if part.get_content_disposition() == "attachment":
count += 1
return count
# ==========================
# Resent 转发,核心逻辑:伪装成系统重发,保持邮件排版不乱!
# ==========================
def build_resent_message(raw_email_bytes):
split_index = raw_email_bytes.find(b"\r\n\r\n")
if split_index == -1:
return None
original_headers = raw_email_bytes[:split_index]
original_body = raw_email_bytes[split_index:]
# 注入 Resent 协议头,实现无损转发
resent_headers = (
f"Resent-From: {EMAIL_ACCOUNT}\r\n"
f"Resent-To: {TARGET_EMAIL}\r\n"
f"Resent-Date: {formatdate(localtime=True)}\r\n"
f"Sender: {EMAIL_ACCOUNT}\r\n"
).encode("utf-8")
return resent_headers + original_headers + original_body
def send_raw_email(raw_message):
context = ssl.create_default_context()
try:
with smtplib.SMTP(SMTP_HOST, 587) as server:
server.starttls(context=context)
server.login(EMAIL_ACCOUNT, EMAIL_PASSWORD)
server.sendmail(EMAIL_ACCOUNT, TARGET_EMAIL, raw_message)
logging.info("📤 邮件发送成功")
return True
except Exception as e:
logging.error(f"❌ 邮件发送失败: {e}")
return False
# ==========================
# 主程序
# ==========================
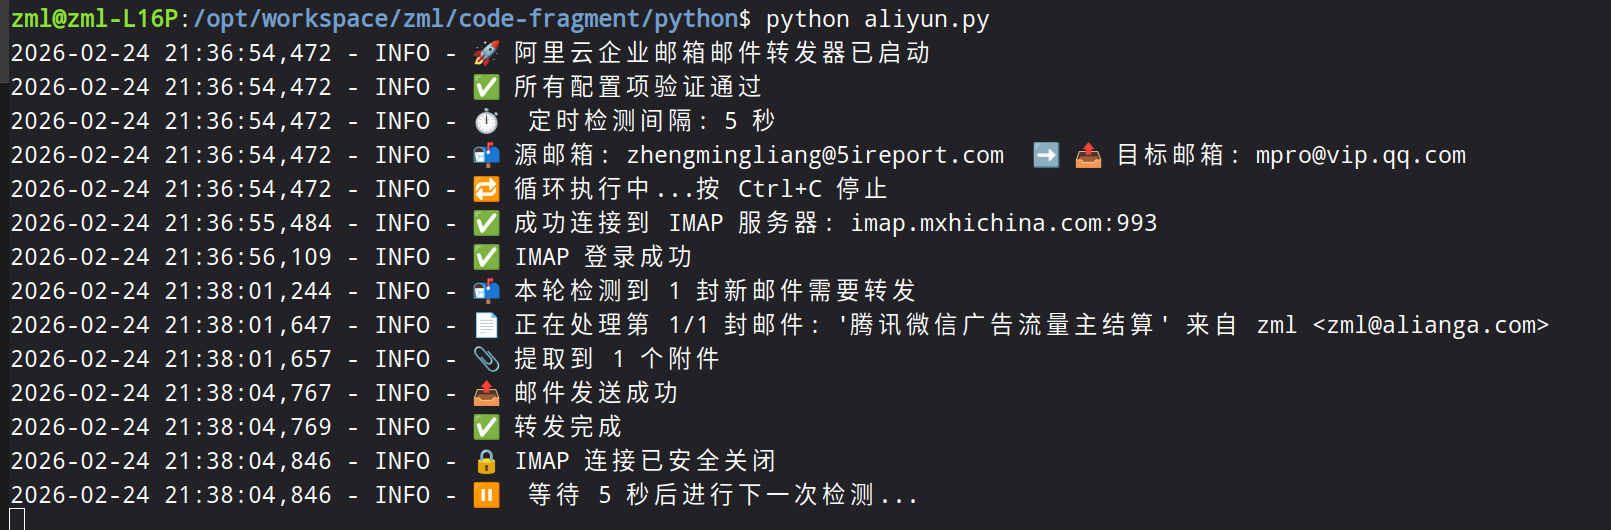
def main():
logging.info("🚀 阿里云企业邮箱邮件转发器已启动")
if not all([IMAP_HOST, SMTP_HOST, EMAIL_ACCOUNT, EMAIL_PASSWORD, TARGET_EMAIL]):
logging.error("❌ 配置项缺失")
return
logging.info("✅ 所有配置项验证通过")
logging.info(f"⏱️ 定时检测间隔: {CHECK_INTERVAL} 秒")
logging.info(f"📬 源邮箱: {EMAIL_ACCOUNT} ➡️ 📤 目标邮箱: {TARGET_EMAIL}")
logging.info("🔁 循环执行中...按 Ctrl+C 停止")
forwarded_uids = load_forwarded_uids()
first_connect = True
try:
while True:
try:
mail = connect_imap(first_connect)
first_connect = False
all_uids = fetch_unseen_uids(mail)
# 只过滤需要转发的
pending_uids = [
uid for uid in all_uids
if uid.decode() not in forwarded_uids
]
if pending_uids:
logging.info(f"📬 本轮检测到 {len(pending_uids)} 封新邮件需要转发")
else:
mail.logout()
time.sleep(CHECK_INTERVAL)
continue
for index, uid in enumerate(pending_uids, start=1):
uid_str = uid.decode()
raw_email = fetch_raw_email(mail, uid)
if not raw_email:
continue
subject, from_display = parse_email_info(raw_email)
logging.info(
f"📄 正在处理第 {index}/{len(pending_uids)} 封邮件: "
f"'{subject}' 来自 {from_display}"
)
attachment_count = count_attachments(raw_email)
logging.info(f"📎 提取到 {attachment_count} 个附件")
resent_message = build_resent_message(raw_email)
if not resent_message:
logging.error("❌ 邮件解析失败")
continue
if send_raw_email(resent_message):
forwarded_uids.add(uid_str)
save_forwarded_uids(forwarded_uids)
logging.info("✅ 转发完成")
else:
logging.error("📤 转发失败,跳过下一封")
mail.logout()
logging.info("🔒 IMAP 连接已安全关闭")
except Exception as e:
logging.error(f"❌ 本轮异常: {e}")
logging.info(f"⏸️ 等待 {CHECK_INTERVAL} 秒后进行下一次检测...")
time.sleep(CHECK_INTERVAL)
except KeyboardInterrupt:
logging.info("👋 用户中断,程序正常退出")
if __name__ == "__main__":
main()
这段代码牛在哪里?(内行看门道)
普通的手动转发往往会把原邮件变成一个“引用的附件”,或者破坏原来的 HTML 排版。
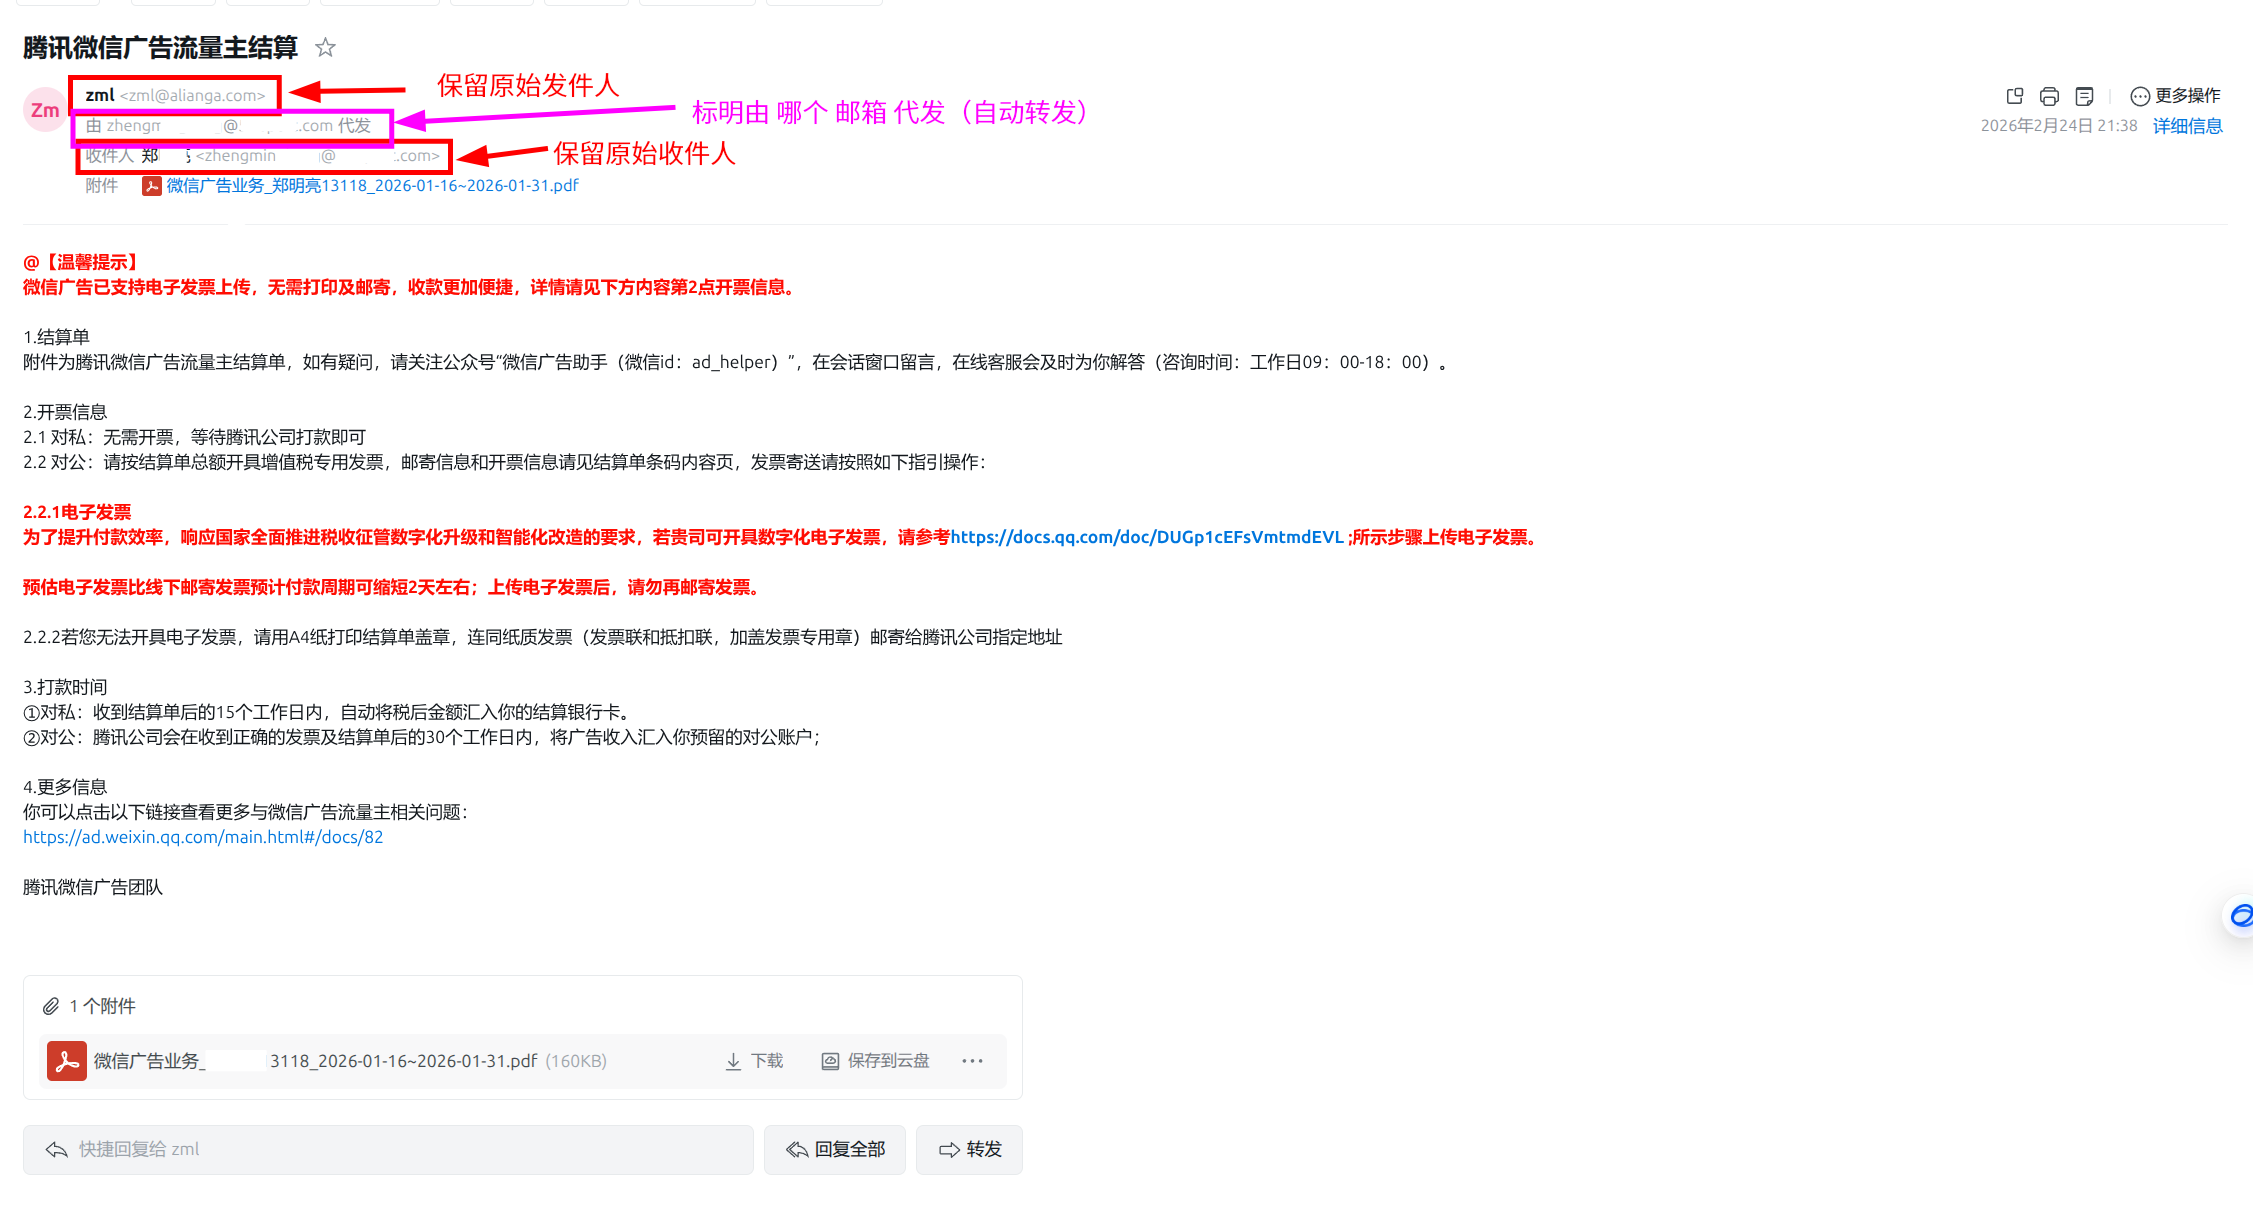
但这段代码使用了邮件底层的 Resent-* 头协议(RFC 2822)!
它并没有改变原邮件的内容,而是像邮局一样在信封外面贴了一层“改签”条(Resent-From)。
最终效果: 转发到 QQ 邮箱里的邮件,看起来和原发件人直接发给你的一模一样!排版原汁原味,附件一个不少,还可以直接在 QQ 邮箱里点击“回复”给真正的发件人!
如何让它跑起来?
- 准备环境: 电脑或服务器安装好 Python (不需要额外安装第三方库,全用系统自带!)。
- 生成授权码: 出于安全考虑,大部分企业邮箱(包括阿里云)不支持直接使用登录密码。你需要在企业邮箱的“设置-安全”中,生成一个**应用专用密码(授权码)**填入代码中。
- 后台挂机: 你可以在自己一直不关机的办公电脑上运行,或者丢到家里的 NAS、几十块钱的云服务器(比如阿里云轻量应用服务器)上,使用
nohup python forwarder.py &让它 24 小时默默为你打工。
转发效果图:
⚠️ 友情提示(求生欲):
技术无罪,但请遵守公司规章制度! 如果你们公司的保密级别极高(比如涉密单位、金融核心岗),请不要试图将敏感数据转发到外部网络哦,避免惹上不必要的麻烦!
如果你觉得这个小工具拯救了你的效率,别忘了点个 “收藏” 和 “赞”!
欢迎在评论区留言:你平时最喜欢用哪个邮箱作为主力? 我们评论区见!👇
Q.E.D.